A Beginner’s Guide to Seed Starting
Simple steps to grow from seed with confidence
Seed starting sounds intimidating… until you realize it’s really just soil, seeds, light, and patience. You don’t need a greenhouse, fancy equipment, or a science degree to start seeds at home. With a few simple setups and realistic expectations, seed starting can be one of the most rewarding parts of gardening—especially when those tiny sprouts pop up.
This guide is designed for beginners who want to try seed starting without overthinking it.
Why Start Seeds?
Starting seeds lets you:
- Grow varieties you won’t always find as transplants
- Get a head start on the growing season
- Save money (one packet = lots of plants!)
- Feel extremely accomplished when things sprout
And yes—some seeds are easier than others. Start there.
Step 1: Start with the Right Seeds
Not all seeds are created equal. For beginners, look for seeds that germinate quickly and reliably.
Great beginner seeds:
- Tomatoes
- Peppers
- Basil
- Zinnias
- Marigolds
- Cosmos
- Lettuce
Seed packets tell you everything you need to know—how deep to plant, when to start, and how long germination takes. Don’t skip the back of the packet!
Step 2: Use Seed-Starting Mix (Not Potting Soil)
This is one of the biggest beginner mistakes. Regular potting soil is too heavy for tiny seeds.
Seed-starting mix is:
- Lightweight
- Well-draining
- Designed for delicate roots
Fill containers loosely, then gently tap to settle—don’t pack it down.
Step 3: Choose a Container (It Doesn’t Have to Be Fancy)
You can start seeds in:
- Seed trays
- Cell packs
- Small pots
- Even recycled containers (as long as they have drainage holes)
Whatever you use, drainage is non-negotiable. Soggy soil leads to rot.
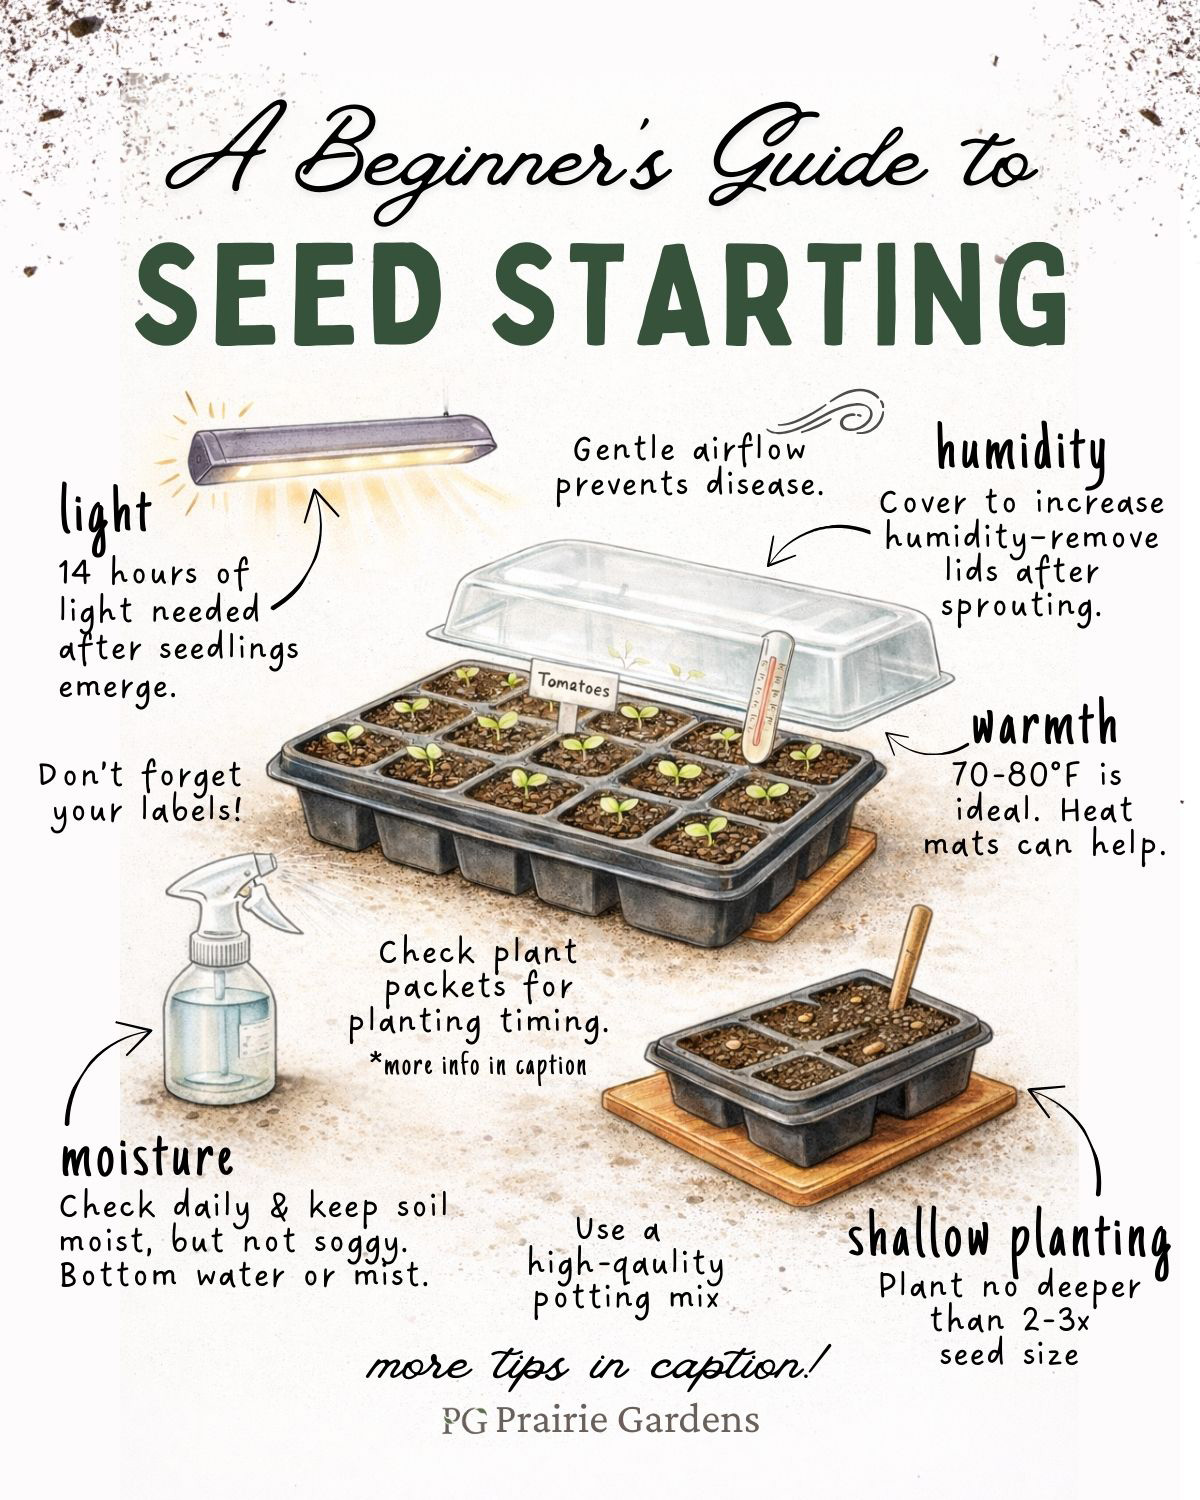
Step 4: Plant at the Right Depth
This part is simpler than it sounds.
- Tiny seeds = plant on the surface or barely covered
- Larger seeds = plant about 2–3× as deep as the seed is wide
If a packet says “surface sow,” gently press the seed into the soil and don’t bury it.
Step 5: Water Gently (Moist, Not Soaked)
Seeds need consistent moisture—but not swimming lessons.
Best watering methods:
- Bottom watering (set trays in shallow water and let soil absorb)
- Gentle misting for surface-sown seeds
The soil should feel like a wrung-out sponge.
Step 6: Light Is Everything
Seeds don’t need light to germinate—but seedlings absolutely do.
Once sprouts appear:
- Place them in a bright, sunny window or
- Use grow lights positioned just a few inches above the plants
Leggy, stretched seedlings = not enough light.
Step 7: Warmth Helps Germination
Most seeds germinate best between 65–75°F.
Helpful tips:
- Keep trays in a warm room
- Use a seed-starting heat mat if needed
- Avoid cold windowsills until after sprouting
Once seedlings are up, slightly cooler temps are fine.
Using Humidity Domes & Trays (And When to Remove Them)
Humidity trays or clear plastic domes can be very helpful during germination, especially for seeds that need consistent moisture to sprout. They help keep soil from drying out too quickly and create a warm, humid environment for seeds to get started.
Once seedlings sprout and break the soil surface, the dome should come off. At that point, seedlings need airflow, light, and slightly drier conditions to grow strong stems. Leaving a humidity dome on too long can lead to weak growth or damping off.
Quick rule:
Dome on for germination, dome off once you see green.
If your home is especially dry, you can remove the dome gradually over a day or two to help seedlings adjust.
When to Start Seeds (Timing Matters!)
Seed packets often say things like:
“Start indoors 6–8 weeks before last frost”
That timing is based on your local frost-free date, which is when it’s generally safe to plant outdoors without risk of freezing temperatures.
For our area (Champaign and most of Central Illinois), the typical frost-free date is around April 15 (give or take a week depending on the year).
That means:
- Seeds started 8 weeks before last frost → mid-February
- Seeds started 6 weeks before last frost → early March
Starting too early can lead to leggy, overgrown seedlings that are hard to transplant—so timing really does matter.
If you’re ever unsure what to start and when, our plant experts are happy to help you count it back.
Step 9: Thin Seedlings (Yes, Really)
It’s hard—but necessary.
When multiple seeds sprout in one cell:
- Keep the strongest seedling
- Snip extras at soil level (don’t pull)
This gives roots room to grow and prevents competition.
Step 10: Harden Off Before Planting Outside
Seedlings grown indoors need time to adjust to outdoor conditions.
About a week before planting:
- Gradually introduce them to outdoor light and wind
- Start with a few hours of shade
- Increase exposure each day
This step helps prevent shock and sunburn.
Common Beginner Seed-Starting Mistakes
Totally normal—everyone does these at least once:
- Starting too early
- Overwatering
- Not enough light
- Using the wrong soil
- Skipping hardening off
Gardening is learning as you go—don’t let perfection stop you.
Seed-Starting Supplies & Help at Prairie Gardens
Whether you’re starting your first seeds or brushing up on the basics, Prairie Gardens has everything you need—from seeds and seed-starting mix to trays, grow lights, and expert advice.
Not sure what to start or when? Our plant experts are always happy to help you choose seeds that fit your space, schedule, and confidence level.
Prairie Gardens
3000 W. Springfield Avenue
Champaign, IL
Let’s grow something from seed together.